In a post a few weeks ago, I talked about the steps involved in getting recipes to a point where they pass the test and move onto the tasting round (which determines if they even make it into the book). With the more complicated ones, you sometimes have to try four or five times before reaching to a point where you are ready to show them off to the world…or in my case, my lovely friends who constantly volunteer as tasters.
In addition to being on the tasting team, some of my crew has taken on bigger tasks. Because she likes to help and wants me to finish this book before I’m old and grey, my dear friend, LF, took on the challenge of testing a recipe for Gorgonzola Grit Cakes last weekend.
This recipe was given to me by a co-worker who hadn’t tried it yet, but had it at this quaint little restaurant in Alabama and scoured the Internet to find it. I should’ve walked away at “haven’t tried it yet” because those are always the ones that take multiple tries before getting it right.
So here is a glimpse at the process. This is the recipe as I gave it to LF:
Gorgonzola Grit Cakes
Serves 6
3 cups water
1 cup stone-ground grits
1 teaspoon salt
3 oz. gorgonzola, crumbled
1 egg, beaten
Flour for dredging
2-3 tablespoons vegetable oil
Bring water to a boil. Add salt and grits and lower heat. Cook until thick, stirring constantly, about 15 minutes. Remove from heat and stir in egg and gorgonzola, stirring until cheese is melted and well combined.
Pour grits into 8" cake pan (round is better). Cool in pan and then refrigerate uncovered until completely set, at least an hour after cool.
With a 2-1/2" round cutter, carefully cut grits into 6 rounds and remove from pan. Dredge rounds in flour.
Heat oil in large skillet until hot. Pan-fry grit cakes until golden, about 2 minutes each side. Serve immediately.
NOTE: Make sure that the oil is hot enough before frying or the grits will begin to fall apart before browning.
And here is her feedback:
• Overall, I thought the flavor was great
• It would have been helpful to have a list of items needed (e.g. 8" cakepan, 2 1/2" round cutter) at the outset of the recipe. I had to read through to determine what I needed as I was making the recipe. I had neither, so I had to improvise which worked out fine.
• I would have liked to have known how long the recipe took from start to finish and if it was easy, medium or hard to make.
• It probably took me 1 1/2 hours total for the cook/chill/fry time. I would classify it as an easy recipe.
• It yielded 10 cakes, not the 6 the recipe states.
• My grits did not set after the hour in the fridge. They were hard to work with. Not sure if you can suggest longer fridge time or adding an ingredient to firm them up. They were hard to put in the frypan, flip and pull out.
• I left half of the batch in the fridge and fried them a few days later. They were a bit easier to work with, but still mushy.
So taking her feedback, I took this recipe into Round Two and made the following changes:
Gorgonzola Grit Cakes (Take Two)
• Cooked the grits for 25 minutes versus 15
• Added an extra egg and simmered the grits after adding the eggs and cheese an extra 5 minutes
• Poured the mixture into a square cake pan and sliced it into nine squares after letting it chill overnight
• Used 1/4 cup of olive oil to fry cakes, four minutes on each side
These changes were semi-successful, although I still didn't like the consistency of the final product. But they were tasty and would make a great addition to the Grits at Noon chapter of my book.
So, anyone up for taking a third stab or making some suggestions?
Sunday, April 29, 2007
Saturday, April 28, 2007
Carolina Shrimp & Grits
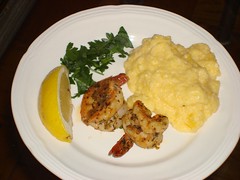
Carolina Shrimp & Grits
Originally uploaded by weezienyc.
Here is the recipe for the Carolina Shrimp & Grits appetizer that I served with the menu a few weeks ago. I served this dish in "tasting servings" but the recipe serves four entrees. Also, the picture was taken before I crumbled the bacon on top, but the bacon makes it even better!
Enjoy! It is delicious!
4 cups water
1 teaspoon salt
1 cup yellow stone-ground grits
1/2 cup butter, plus 2 tablespoons divided
2 cups shredded Cheddar cheese
1/4 teaspoon garlic powder
3 eggs
3/4 cup half-and-half
1/4 cup diced onion
1 lb. fresh shrimp, peeled and de-veined
1 1/2 teaspoons herbs de provence
1 1/2 teaspoons Cajun seasoning
½ pound bacon, crumbled
Preheat oven to 350° F. Combine water, ¼ cup butter, and salt in 2-quart saucepan and bring to a boil. Slowly whisk in grits. Reduce heat to low-medium and simmer for 30 minutes, stirring constantly.
Meanwhile, beat eggs and half-and-half together. Once grits have thickened, remove them from heat and stir in ¼ cup butter, cheese, and garlic powder. Add the egg mixture and stir well.
Pour mixture into greased 2-quart casserole dish and bake for 30 minutes.
15 minutes before grits are finished baking, sauté onion in 1 tablespoon butter in heavy saucepan until soft, approximately 5 minutes. Add shrimp, herbs de provence, cajun seasoning and remaining butter. Cook, stirring constantly, until a rue forms.
Divide grits on four plates. Spoon shrimp over grits and top with crumbled bacon.
Wednesday, April 18, 2007
Rod's Rub and Roasted Garlic Grits
As I mentioned in yesterday’s post, I’ve been spending quite a lot of time in the tiny kitchen working on the cookbook. The process goes like this:
- begin with starting recipe
- cook recipe making adjustments
- edit recipe
- retest recipe
- edit recipe
- retest recipe, etc.
Once I’ve gotten a recipe to a place where it is ready for public debut, the tasting round begins, bringing with it another round of cooking. Not only am I working to publish a book of delightful and fully-tested grits recipes, I’m working to publish a book containing menus featuring Grits as the star. So along with every grits recipe in the book, one will find suggested recipes to round out the entire meal. And from where are those suggested recipes coming? My tiny kitchen, of course.
At least every two weeks, I invite over the members of the tasting team, consisting of 10-15 of my friends. There are five “super tasters” who play a larger role in getting this book published and then whomever can make it. These meals give me a chance to see my friends and my friends a chance to offer feedback on the grits recipes, as well as the meal with which they are paired.
A few weeks ago, I had a tasting. The same night I served the Grits and Cheese biscuits, I also served:
Carolina Shrimp and Grits appetizer
Sweet Mesquite Chicken Legs
Roasted Garlic Grits
Steamed Vegetables
Chocolate Cupcakes
This meal was so delicious that I almost forgot about how dry the biscuits were. I’m one of those cooks that doesn’t want to eat after cooking all day. But on that Sunday, there was a moment upon tasting the meal before serving it, that I actually considered shoving my guests out of the front door so I could sit down to a platter of chicken and a 2-quart saucepan of grits all to myself.
As you all know, grits are usually the stars of my meals. But this time, the Sweet Mesquite Chicken legs stole the show. They were delicious and, unfortunately, I can’t take the credit. All of the props go to Rod Brown, a friend of mine from Atlanta.
Rod loves to cook, especially southern cuisine and barbeque. When an Atlanta restaurateur learned of Rod’s passion for creating great barbeque, he asked him to design a custom dry rub for his new restaurant. The restaurant never opened, leaving Rod with three dry rub recipes without a home.
Luckily, Rod is married to my good friend Melanie, the most driven entrepreneur I know. Do you know what happens when a cook and an entrepreneur get married? A business is born – Rod’s Rub.
I’ve used all three varieties in various recipes over the past few weeks, and the Sweet Mesquite is hands down my favorite. It doesn’t hurt that it takes less than five minutes to prepare, compared to the hour is takes to make the grits.
Here are the recipes for the Sweet Mesquite Chicken Legs and the Roasted Garlic Grits. Make them together and let me know your thoughts:
Sweet Mesquite Chicken Legs
Serves 8
Two lbs Chicken Legs, approximately 15-16
Olive Oil (2 -3 tablespoons)
Rod’s Rub Sweet Mesquite variety
Place ½ of chicken in large Ziploc bag. Drizzle olive oil over chicken. Shake rub into bag and shake until well coated. Repeat with remaining chicken.
Place chicken in a baking dish and cook on 350 degrees for an hour, flipping the legs every 15 minutes.
Roasted Garlic Grits
Serves 8
4 large heads garlic
1/4 cup olive oil
1/4 teaspoon salt
1 quart vegetable broth
1 tablespoon salt
¼ cup unsalted butter
1 cup coarse, white stone-ground grits
1/4 cup half-and-half
1/3 cup Parmesan- Reggiano, grated
Slice off the bottom of garlic head, and separate the cloves, leaving the outer covering in place. Put the cloves in a shallow 8-inch square baking dish, and drizzle with olive oil.
Bake at 350 degrees for about 20 minutes until the garlic is soft. Cool and remove the skins. In a food processor or blender, add garlic, salt, pepper and lemon juice. Process 30 seconds or until almost smooth, scraping sides occasionally. Set garlic mixture aside.
In a 3-quart saucepan, heat the vegetable stock over high heat until boiling. Add the salt and butter. Once butter has melted, slowly stir in the grits, and return to a boil. Reduce the heat and simmer 45 minutes, whisking constantly until thickened.
Remove from heat. Stir in the garlic mixture, half-and-half and cheese until creamy. Return to heat and simmer on low for an additional 5 minutes. Serve immediately.
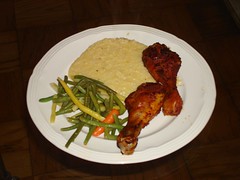
Mesquite Chicken and Roasted Garlic Grits
Originally uploaded by weezienyc.
- begin with starting recipe
- cook recipe making adjustments
- edit recipe
- retest recipe
- edit recipe
- retest recipe, etc.
Once I’ve gotten a recipe to a place where it is ready for public debut, the tasting round begins, bringing with it another round of cooking. Not only am I working to publish a book of delightful and fully-tested grits recipes, I’m working to publish a book containing menus featuring Grits as the star. So along with every grits recipe in the book, one will find suggested recipes to round out the entire meal. And from where are those suggested recipes coming? My tiny kitchen, of course.
At least every two weeks, I invite over the members of the tasting team, consisting of 10-15 of my friends. There are five “super tasters” who play a larger role in getting this book published and then whomever can make it. These meals give me a chance to see my friends and my friends a chance to offer feedback on the grits recipes, as well as the meal with which they are paired.
A few weeks ago, I had a tasting. The same night I served the Grits and Cheese biscuits, I also served:
Carolina Shrimp and Grits appetizer
Sweet Mesquite Chicken Legs
Roasted Garlic Grits
Steamed Vegetables
Chocolate Cupcakes
This meal was so delicious that I almost forgot about how dry the biscuits were. I’m one of those cooks that doesn’t want to eat after cooking all day. But on that Sunday, there was a moment upon tasting the meal before serving it, that I actually considered shoving my guests out of the front door so I could sit down to a platter of chicken and a 2-quart saucepan of grits all to myself.
As you all know, grits are usually the stars of my meals. But this time, the Sweet Mesquite Chicken legs stole the show. They were delicious and, unfortunately, I can’t take the credit. All of the props go to Rod Brown, a friend of mine from Atlanta.
Rod loves to cook, especially southern cuisine and barbeque. When an Atlanta restaurateur learned of Rod’s passion for creating great barbeque, he asked him to design a custom dry rub for his new restaurant. The restaurant never opened, leaving Rod with three dry rub recipes without a home.
Luckily, Rod is married to my good friend Melanie, the most driven entrepreneur I know. Do you know what happens when a cook and an entrepreneur get married? A business is born – Rod’s Rub.
I’ve used all three varieties in various recipes over the past few weeks, and the Sweet Mesquite is hands down my favorite. It doesn’t hurt that it takes less than five minutes to prepare, compared to the hour is takes to make the grits.
Here are the recipes for the Sweet Mesquite Chicken Legs and the Roasted Garlic Grits. Make them together and let me know your thoughts:
Sweet Mesquite Chicken Legs
Serves 8
Two lbs Chicken Legs, approximately 15-16
Olive Oil (2 -3 tablespoons)
Rod’s Rub Sweet Mesquite variety
Place ½ of chicken in large Ziploc bag. Drizzle olive oil over chicken. Shake rub into bag and shake until well coated. Repeat with remaining chicken.
Place chicken in a baking dish and cook on 350 degrees for an hour, flipping the legs every 15 minutes.
Roasted Garlic Grits
Serves 8
4 large heads garlic
1/4 cup olive oil
1/4 teaspoon salt
1 quart vegetable broth
1 tablespoon salt
¼ cup unsalted butter
1 cup coarse, white stone-ground grits
1/4 cup half-and-half
1/3 cup Parmesan- Reggiano, grated
Slice off the bottom of garlic head, and separate the cloves, leaving the outer covering in place. Put the cloves in a shallow 8-inch square baking dish, and drizzle with olive oil.
Bake at 350 degrees for about 20 minutes until the garlic is soft. Cool and remove the skins. In a food processor or blender, add garlic, salt, pepper and lemon juice. Process 30 seconds or until almost smooth, scraping sides occasionally. Set garlic mixture aside.
In a 3-quart saucepan, heat the vegetable stock over high heat until boiling. Add the salt and butter. Once butter has melted, slowly stir in the grits, and return to a boil. Reduce the heat and simmer 45 minutes, whisking constantly until thickened.
Remove from heat. Stir in the garlic mixture, half-and-half and cheese until creamy. Return to heat and simmer on low for an additional 5 minutes. Serve immediately.
Mesquite Chicken and Roasted Garlic Grits
Originally uploaded by weezienyc.
Tuesday, April 17, 2007
Cooking in a closet
I’ve mentioned before that writing this cookbook has been a much larger undertaking than I anticipated. I had no clue how much time was required for the on-going research, business plan development, and the actual planning of the book. I spend at least 15 hours a week dedicated to the “business” and at least 30 hours a week writing/testing/editing/ recipes.
Lately, I feel like I’ve been living in my tiny Manhattan kitchen. I am either standing over the tiny stove, constantly whisking grits to ensure they don’t burn (sometimes I get distracted and this happens) or doing dishes in the tiny sink. I am a southerner and we have a tendency to exaggerate, but I’m not even kidding you when I tell you that everything about my kitchen is tiny.
The first house I can remember as a child had a small kitchen. My mama basically started her catering business in that kitchen. To this day my dad still can’t eat chicken salad because there was always chicken cooking on the stove and a Tupperware of chicken salad in the fridge. And, for a year, I seriously forgot that white bread was actually sold with crust.
As I think back on it, I am amazed that Mama was able to produce the entire menu for a wedding reception in such a small space. And now, I find myself amazed that I cook “tasting” meals for 15+, in what is basically a coat closet containing a stove and a sink.
This is where the magic happens!
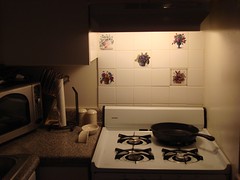
Tiny Kitchen
Originally uploaded by weezienyc.
Lately, I feel like I’ve been living in my tiny Manhattan kitchen. I am either standing over the tiny stove, constantly whisking grits to ensure they don’t burn (sometimes I get distracted and this happens) or doing dishes in the tiny sink. I am a southerner and we have a tendency to exaggerate, but I’m not even kidding you when I tell you that everything about my kitchen is tiny.
The first house I can remember as a child had a small kitchen. My mama basically started her catering business in that kitchen. To this day my dad still can’t eat chicken salad because there was always chicken cooking on the stove and a Tupperware of chicken salad in the fridge. And, for a year, I seriously forgot that white bread was actually sold with crust.
As I think back on it, I am amazed that Mama was able to produce the entire menu for a wedding reception in such a small space. And now, I find myself amazed that I cook “tasting” meals for 15+, in what is basically a coat closet containing a stove and a sink.
This is where the magic happens!
Tiny Kitchen
Originally uploaded by weezienyc.
Sunday, April 8, 2007
Cookbook Progress
I'm slowly, but surely making some headway on the cookbook. I've been testing a lot of recipes, trying to get at least one chapter in order before I finalize my book proposal. Trying to figure out how to organize the book hasn't been a simple task. I've gone back and forth for weeks on how to categorize the recipes in order to put them into chapters. I've finally made a decision on the chapters and titles and here they are:
Now that I’ve got the chapters selected, all I need to do is figure out a name for the book.
Any suggestions?
- Morning Grits: Warm and quick dishes served in the early hours
- Grits at noon: Heartier dishes served at brunch, preferably with Bloody Mary's or Mimosas
- Evening Grits: Meals starring grits: Some fast, some fancy
- Shrimp and Grits: Low-country favorites, perfect for all hours of the day
- Grits on the Side: A collection of side dishes with suggestions for accompaniments
- Grits and More: All of the other grits recipes that didn’t fit into one of the other chapters
Now that I’ve got the chapters selected, all I need to do is figure out a name for the book.
Any suggestions?
Saturday, April 7, 2007
Grits and Cheese Biscuits
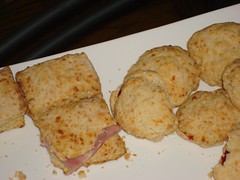
Grits Biscuits with Ham and Strawberry Jam
Originally uploaded by weezienyc.
A few weeks ago I had some friends over for another recipe tasting. As an appetizer, I served mini grits and cheese biscuits filled with ham or strawberry jam. The biscuits had a great flavor, especially when served with the jam, but were too dry.
The addition of the grits adds a crunchy texture to the biscuit, but I want to find a way to keep the crunch without drying out the palettes of my guests. I’ve posted the recipe and welcome (translation = am begging for) any suggestions.
Recipe for Grits and Cheese Biscuits:
Makes 12 - 14 biscuits
1-1/2 cups all-purpose flour
½ cup quick cooking grits, uncooked
4 teaspoons baking powder
¼ teaspoon salt
½ cup butter
1 cup shredded sharp cheddar cheese
½ cup milk
Heat oven to 425ºF. Combine the flour, grits, baking powder, and salt. Cut in margarine until mixture resembles course crumbs. Stir in cheese. add milk, mixing just until dry ingredients are moistened.
Shape dough to form a ball; knead gently on lightly floured surface 3 to 4 times. Roll out dough to form 8-inch square. Cut dough into four 2-inch wide strips; cut each strip crosswise into 4 pieces. Place biscuits about 1 inch apart on ungreased cookie sheet. Bake 12 to 14 minutes or until golden brown.
Subscribe to:
Posts (Atom)

